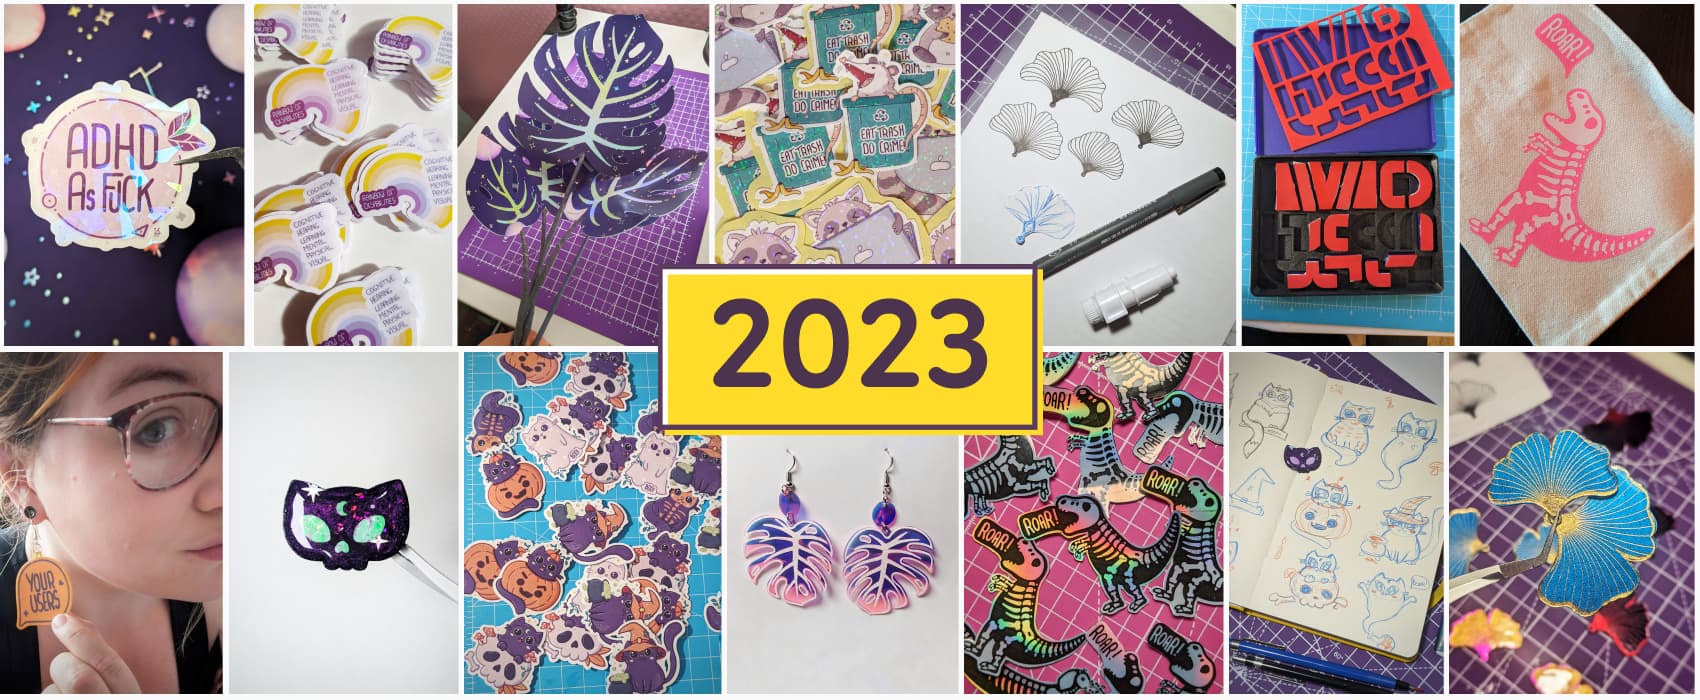
2023 wrap-up – the craft and creative part
Let’s start 2024 with a little creative wrap-up of 2023. This part is about craft, and the things I created this year, with my little hands that are not work related: illustrations, sticker, but also paper plants, earrings in many types of materials, hot foiling, glow in the dark mayhem and so much moreother fun things with different materials and techniques. If you are interested in my actual work, check the professional 2023 wrap-up.
Last year, I told you I bought a Silhouette cameo 4 cutting machines. Last yes, I said that, for 2023, I wanted to have more fun with cutting, print my own holographic stickers and sell stickers online. I’m happy to report, I did all 3. I didn’t paint the pink wall yet, though. Damn. So, anyway, let’s get started.
Stickers
Glitter and holographic stickers
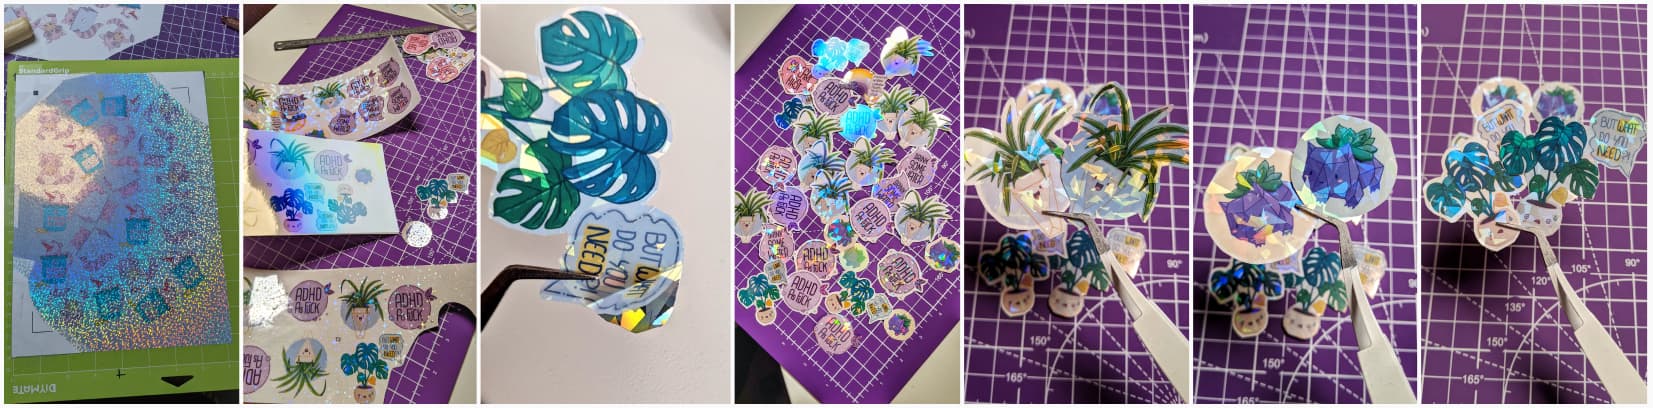
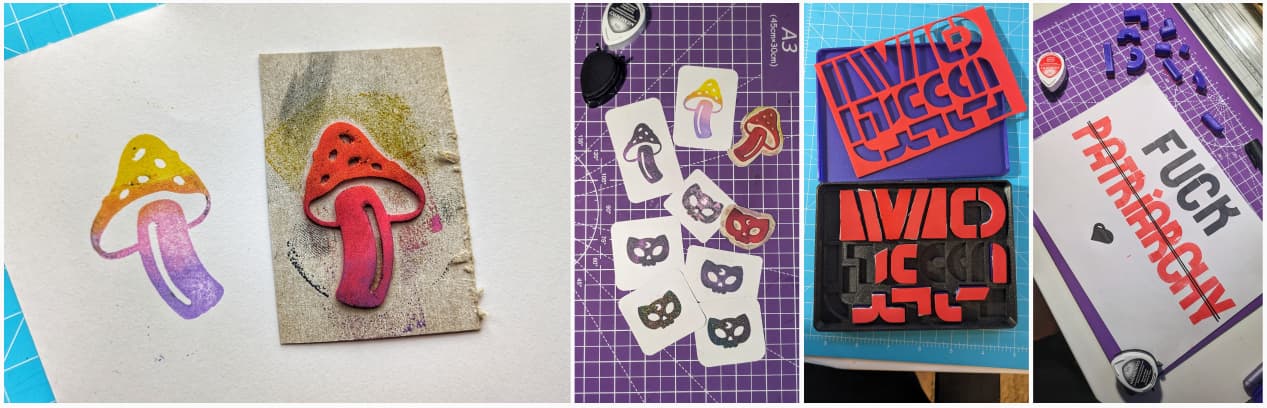
Yeah, as I said, I continued my sticker mayhem this year. I started with some tests for holographic stickers. There’s basically 2 options: you either print on shiny holographic / sticker paper. Or you print on regular sticker paper, and add a shiny overlay (cold lamination). I made an Instagram video of the final result of both techniques if you want to compare.
I run some tests, there were a lot of epic fails. The main issue is that the silhouette won’t read properly the registration marks for both techniques, because the laser is getting reflected by the paper, or the overlay. So, my first tests were not cut properly, and I had to cut them by hand (instagram video). Which defeats the purpose of the cutting machine. I eventually found a way: I put some white paper in the corners and print the registration marks on top of it.
But, I also discovered that the shiny paper I printed on was not reliable. The shiny overlay, whether it’s holographic or glitter, would rip when getting cut. I also separate when cut with the machine. If you are curious, I made a much drama video on the topic. So, I gave up on the printed paper and concentrated on the overlay option. I was able to have.
The overlay technique works way better for me. I also admit, I prefer the colors with that technique. So, using the overlay glitter paper, I reprinted a couple of 2022 models. Here’s an Instagram montage of the cutting part.
The raccoons, opossums, and capybaras stickers
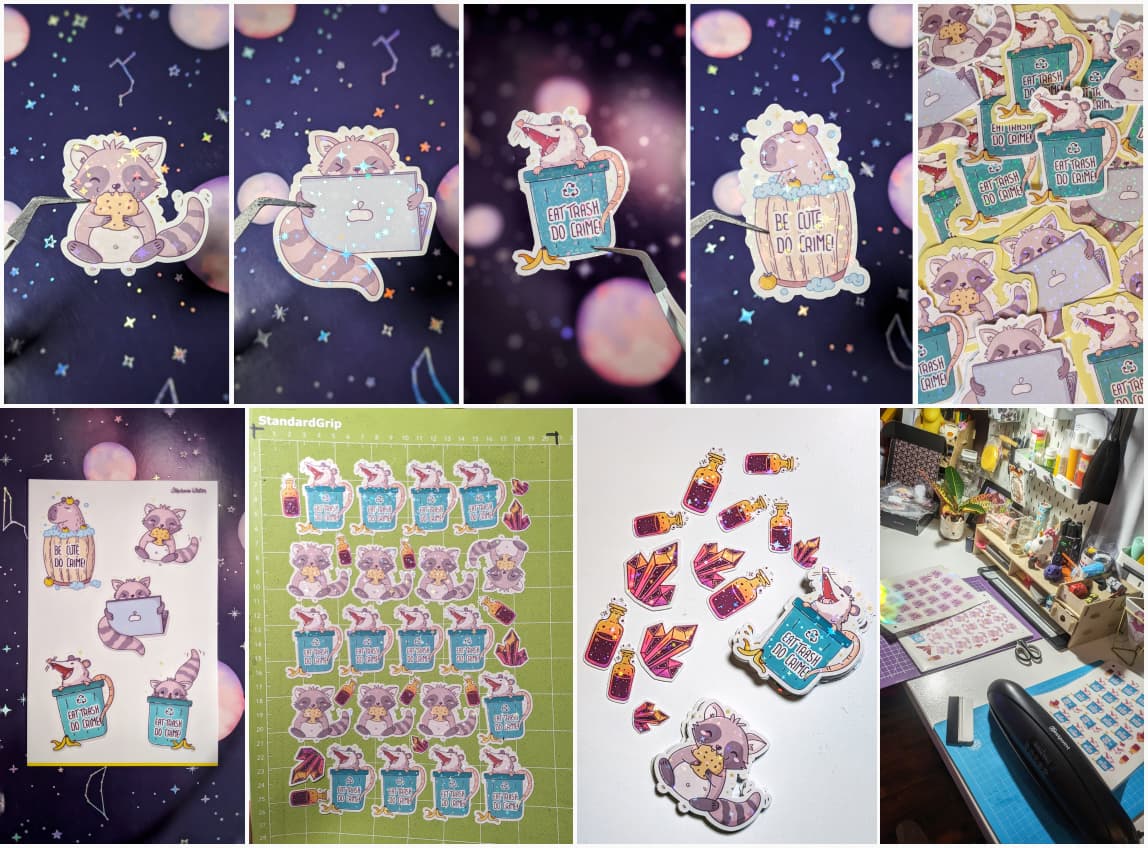
In 2023, I migrated to a new mastodon instance, and I decided to design our instance mascot. It started with a raccoon, then an opossum was added.
And of course, since I finally found a decent way to get some shiny stickers, holographic and glitter ones, I had to make stickers. I also designed a new one middle of the year: the “be cute, do crime” capybara. Since I don’t like to waste paper, I’ve also created some “fillers”: small stickers that I can sneak into a batch. That batch got a few sunrise witchy ones that I usually offer to people.
If you are curious about part of the process, I recorded an Instagram video that shows the stickers getting separated on the final sheet, with some new sheets cutting in the background. And, if you are into ASMR, there’s another fun video with the satisfying sound of peeling the stickers from the mat.
Holographic dino stickers
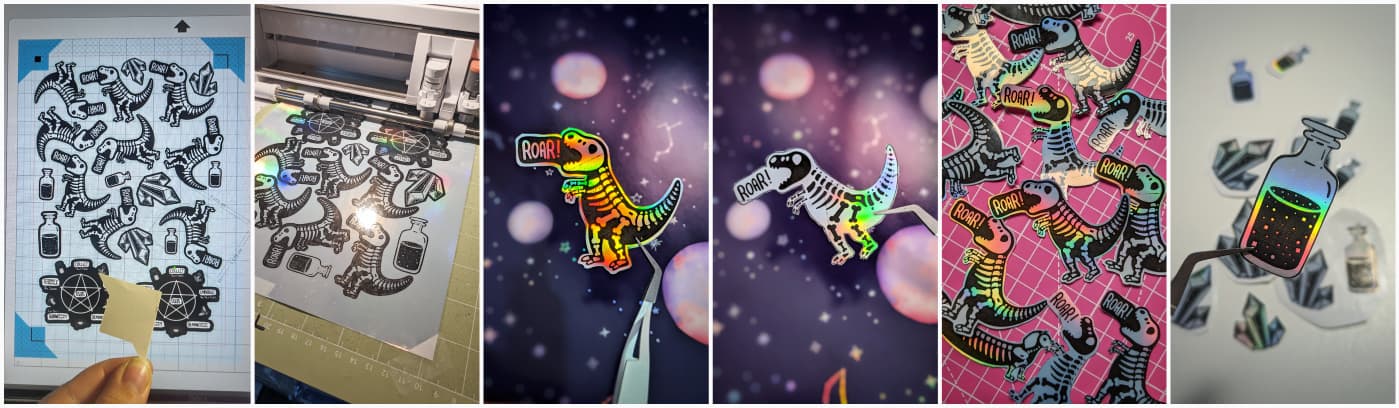
Okay, I was lying when I said I gave up on printing on the holographic paper. I decided to give it another chance. But, this time, I used a laser printer that only prints in black to print some dino stickers. I used again the “put some white in the corners and print the marks on it”. If you are curious about the technique I explain in on Instagram. But, well, you guessed it: cutting was a mess again. Again. But, I was able to salvage 30% of them. And, again, I added some fillers. My conclusion on this: the laser works better than the ink. Because if lets you print something in black, on top of it, without getting all holographic. So, you keep the holo effect for the white parts. But, honestly, I think holographic stickers are a mess to print at home, so, for such ones, I will still order online.
Halloween cats

I’ve always wanted to do some “themed” illustration series. So, this year, I’m not sure why, I decided to design a set of 5 cute little Halloween themed cats. Here’s a little behind the scene on Instagram on how I made those. I’ve made 2 versions: sparking star ones, and regular glossy. Enjoy another video with them all. The glossy ones have some mica powder to add subtle, very little sparkles.
More stickers related to my work
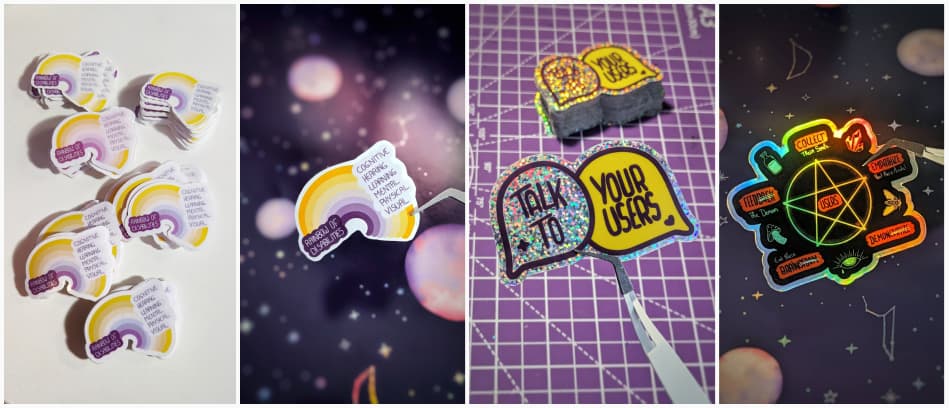
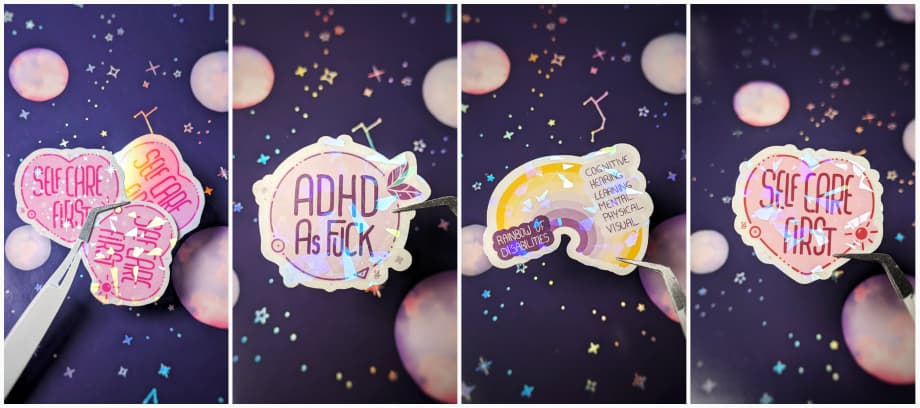
I talked a lot about accessibility at conferences this year. So, I reworked my rainbow of disabilities to give away at some conferences. I also created “talk to your users” stickers. And last but not least, I’ve created a very silly “Pentagram User Centric Design Process” drawing. I tried to print it at home (you can get a glimpse in the dino video) but I wasn’t happy about it. So, I ended up ordering online. Also, that one was meant to be a joke, but, some people asked if they could get a T-shirt. So, this is how I ended up with a Redbubble shop. You can find here my pentagram.
Buy my stickers!
Some folks wanted to buy my stickers, so I set up a page on this site. I might set up a shop this year, but, this takes a lot of time. So, for now, if you want some stickers, check the page, tell me what you want and I’ll send you a paypal or stripe link.
Papercraft
This year, I also explored more paper options.
Space monstera
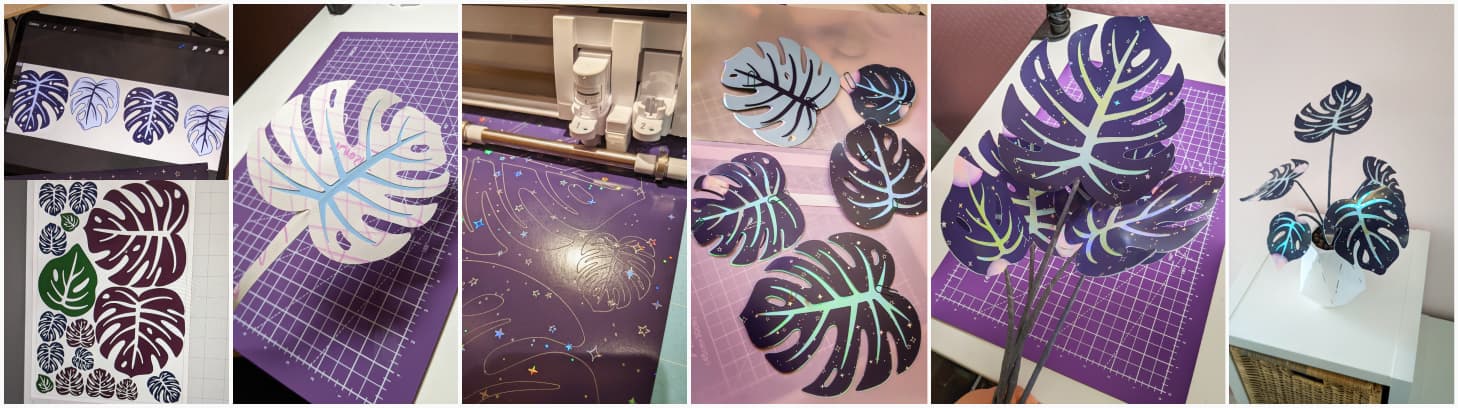
I have a dark entrance in my flat, no plant would survive. So, I wanted to make a nice monstera. But, I’m not a big fan of realistic ones, so, I went full space monstera! Like most of my projects, this started with some drawings on the iPad, and some prototype with draft paper. I posted the whole making of on Mastodon.
Check the cutting video if you are curious about how the silhouette works. The space paper is from HEMA. There is a layer of 0.2mm iridescent PVC in the middle for the shiny effect. Trust me, this one is a mess to glue. I also made a nice video to show the final plant, in the entrance.
Mini monstera earrings, pendant and plants
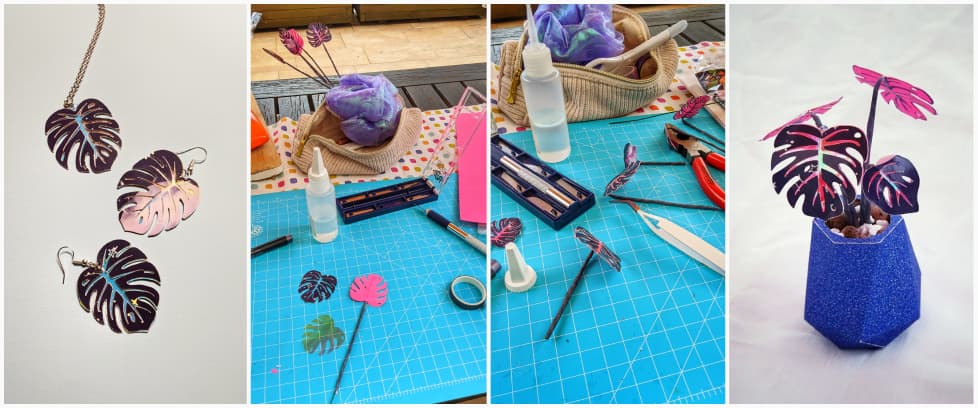
I told you before, I don’t like to waste some paper. So, between the big monsteras, I also cut smaller ones. I turned those into some earrings. And since I love a good challenge, well, I decided to add iridescent PVC in the middle. I found some 0.7mm sheets. Cutting the 0.7m was not easy. I got a 2mm manual blade and found a tutorial where the Alexis explains how to cut shrink plastic with multiple passes at different bland depths. You can see the in between PVC in the Instagram video.
I still had some extra leaves left, so, I made 2 small mini monstera plants as well. This way, the big plant doesn’t feel too alone.
Vinyl and plastic projects
Of course, now that I knew I could cut plastic, I decided to give it a try. And play with adhesive vinyl for various projects.
PVC iridescent earrings

I started with some plastic iridescent earrings, playing with the same cutting file as my monsteras. Those are cut in a 0.7mm PVC. I then cut the stems in some glitter vinyl, and put those together. It was fun, but, after wearing them, the glitter vinyl started going away. So, I needed something to seal it.
PVC UV resin dimensional mod podge earrings
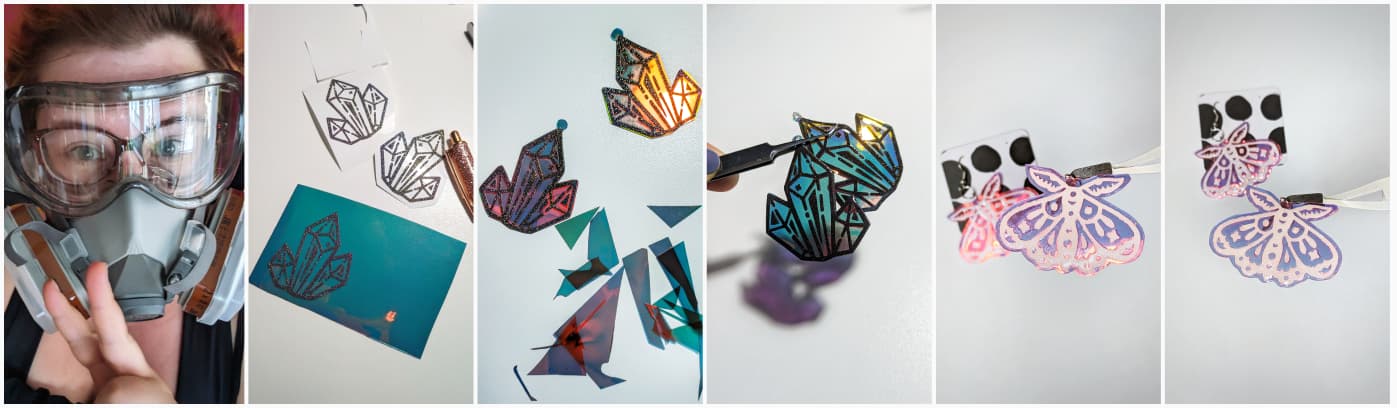
This is where I started digging into sealing material. I discovered UV resin. I did a lot of research on that one, and discovered you better wear a mask for the VOC fumes. Safety first, I went to my favorite DIY store, and got myself a very nice 3M™ 6002PRO mask. I also got myself some protective glasses, just in case. I love the post apocalyptic look. Pro tip: this is also, perfect for peeling onions without crying. I’m not even kidding, I’ve actually tested it.
Now that I was equipped, I created some crystal earrings. This is again PVC, and some glitter vinyl. Then I added some UV resin to cure, protect and bring some shine. I love how they turned out. You can check the fun shadows it projects on the Instagram video.
I liked the UV resin look, but, it distorted a little the plastic while curing. So, I decided to experiment also with another technique. I found some dimensional mod podge, so I created some other moth earrings made with iridescent 0.7mm PVC and some vinyl.
Vinyl holographic glow in the dark pins
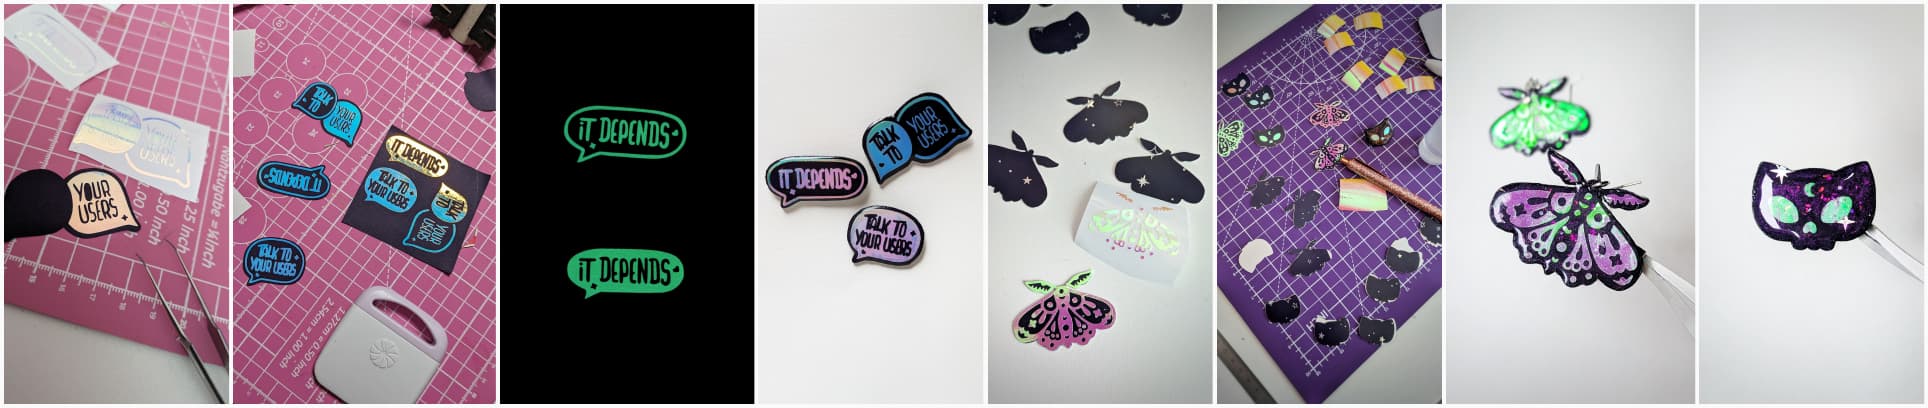
I really liked the vinyl from techwrap that I used for the earrings. And, order of different vinyls, including some holographic glow in the dark ones. So, of course, I had to order it.
My first attempt was some “Talk to your users” and “It depends” pins. The first attempt was with shrink plastic as support, the iridescent vinyl, and UV resin. I put the making of on Instagram. I found it quite frustrating because if stretches when shrinking, so, my vinyl didn’t fit perfectly. While looking for a solution for this, I discovered Kandor, who makes keychains with cardstock. So, I decided to give it a try and created some Luna inspired pins, and a couple of moths . Again, you can check the video of the making of on Instagram for the Luna cat and the Moth earrings. I’m using some mica powder for the glitter. I sealed both with UV resin. And, friends, I love this little cat pin, I think I’ve been wearing it at most events this year.
Paper and vinyl tentacle earrings
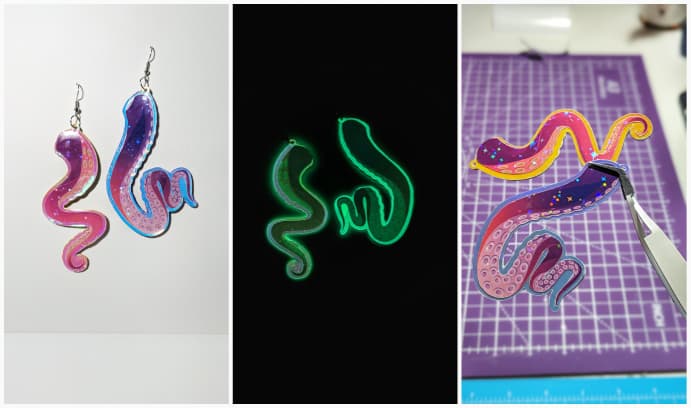
Speaking of events, at the end of the year, Myriam was talking at ParisWeb. I decided she needs some tentacle earrings with glitters and glow in the dark vinyl, so here we go, full reel on Insta. Same technique: layers of cardboard, glued, pressed, and then some vinyl on top of it.
Pen and Foil Fun
I think that there’s some sort of rabbit hole you fall into when you get a cutting machine like a Silhouette (also, pretty sure it’s the same for Cricut). You start with cutting stickers, and discover there are tones of accessories. So, of course, this year, I had to get the pen tool. It’s as easy as it sounds: you put a pen instead of a blade, and you get to draw stuff. It works marvelously with lines. I’ll admit it’s a little clumsy when you want to fill, but, you can.
Winter Solstice Cards
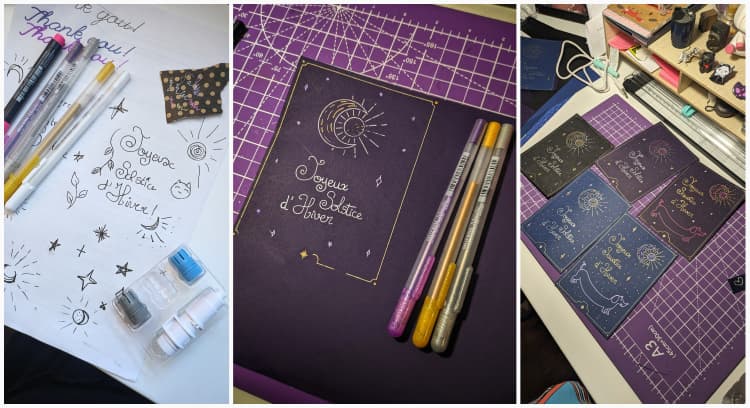
So, I got myself some metallic gel pends. And I created some Joyeux Solstice d’Hiver (Happy Winter Solstice) French cards. And, of course, I had to make a very silly joke in French on the sausage dog, that became “Joyeux Saustice d’Hiver” (Happy Winter Saustice, or something like that?). The trick is that you need some lines to make this work. So, this won’t work with most fonts, since those end up as outlines. So, I took my iPad, and wrote this directly in there, and drew the whole card.
Foil Quill Ginkgo Leaves
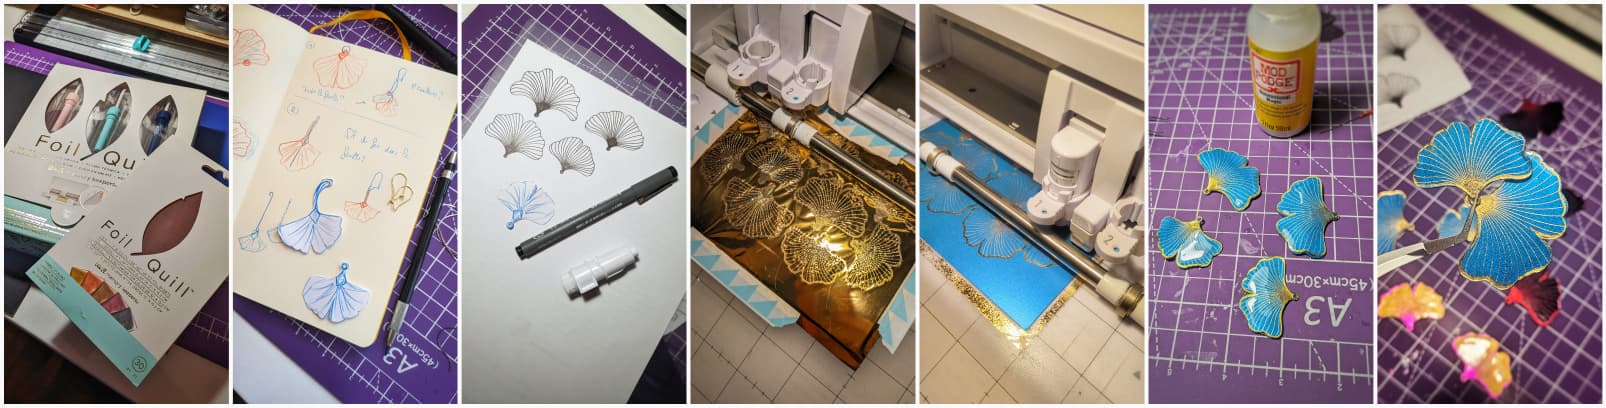
And, one thing leading to the other, of course I discovered you can put a foil quill pen in the Cameo 4 using the We R Memory Keepers Foil Quill kit for my machine. I started with a small “Thank you” motive (Reel on Instagram).
And then, I created some ginkgo leaves, to make earrings and pendants. I’ve been designing and prototyping those from scratch, using the pen tool to test, then the foil quill. We are at iteration 3, 2 days of research and rework, still not perfect, but I’m getting there. The way it works: I put a thin sheet of gold foil on top of the blue paper, then use the hot pen to transfer that foil to the blue paper. It’s the same technic as when using the Silhouette drawing pen. Instead of a pen, it draws on top of the foil. You can watch the Instagram story that details the whole process.
I’m currently waiting for some teal foil, to create new ones with different colors. Stay tuned for 2024 update.
Heat Transfer Vinyl
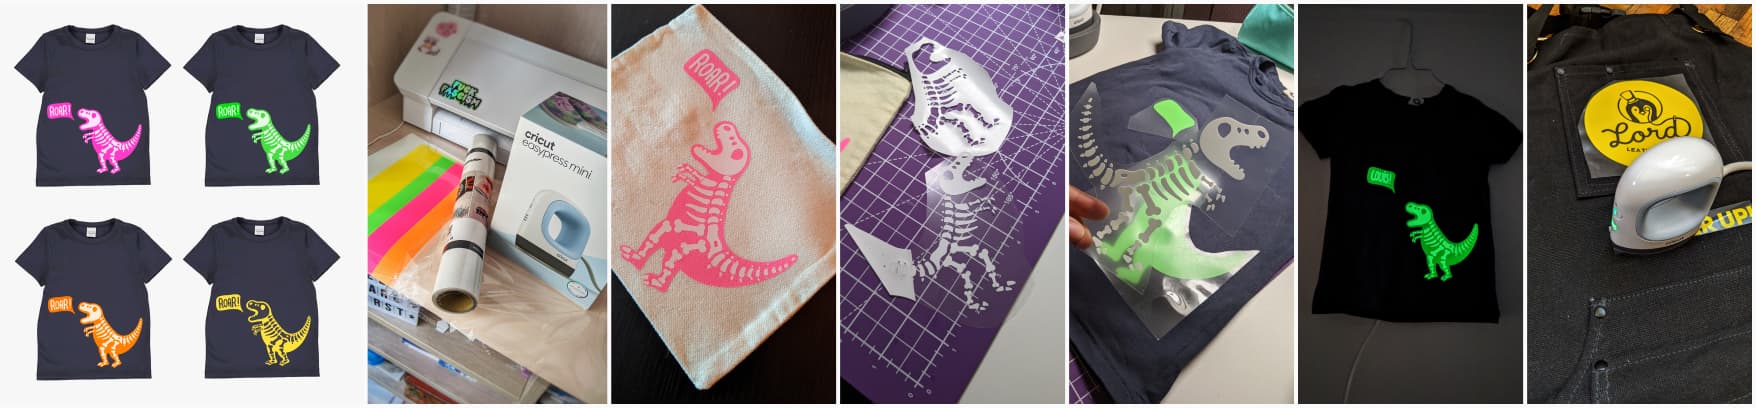
After checking a couple of vinyls I can cut with the silhouette, I discovered HTV: heat transfer vinyl. I created a dino two color illustration. I wanted to create a shirt for my nephew. Since I never worked with HTV because, I decided to start with a first MVP. I sublimated (apparently that’s the fancy word crafters use when they stick stuff on other stuff) a pencil case with a vibrant pink glow in the dark dino.
Then I designed the real shirt. I went for a glow in the dark green dino with white bones, and, yeah, it was very cool. I lost a couple of the small bones, but they were like 1mm, so, to be expected. Check the making of on Instagram
I also customised a craft apron for Lord Leathercraft. This one glows in the dark too.
Shrink plastic
The last type of material I experimented with this year is shrink plastic. I think it’s the one that is the most frustrating so far. The reason is simple: it will get distorted when you shrink. So, it’s quite annoying when you want to put vinyl on it and need precision.
Keychains and earrings with semi transparent shrink plastic and vinyl
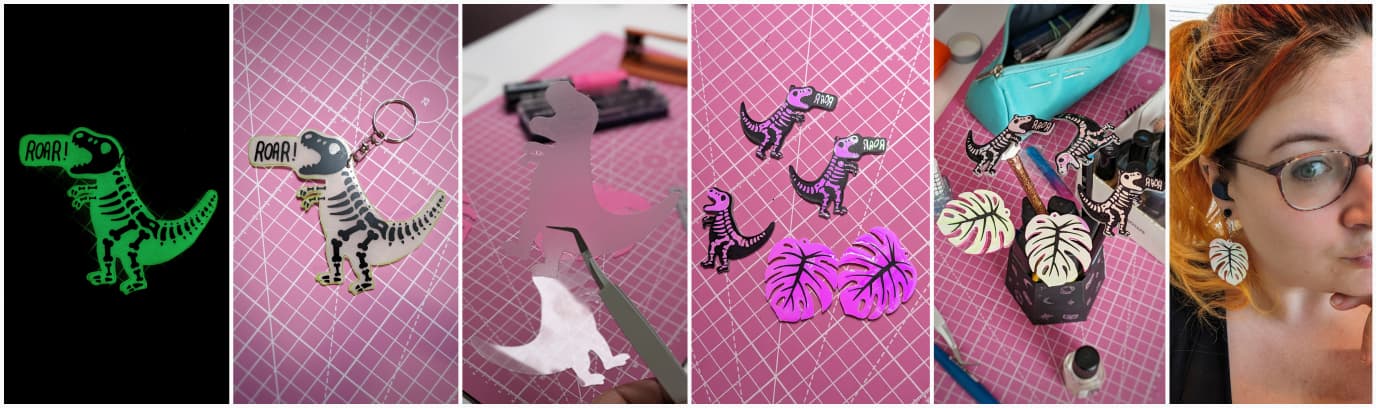
Apparently, keychains are a mandatory step in the craft community when you play with shrink plastic. I got excited and got some glow in the dark shrink plastic, because, why not? I created another version of the dinosaur: a glow in the dark dino keychain. I covered it with some black vinyl for the bones. I had to rework the design, because, it skewed in a certain direction.
I also tried some black dinos with some vinyl, using the amazing techwrap glow in the dark vinyl as bones. And, some monstera earrings, with some opal vinyl and dark vinyl stems. This was annoying to make. The plastic shrunk in one direction, I had to re-work the vinyl, would not recommend. Also, I’m not obsessed with monsteras, I swear. But usually when I try a new material I like to re-use old designs that I know work, so I can focus on the material.
I think shrink plastic is very fun if you draw directly on it, with posca for example. But, in my case, I wanted to use it as a solid surface for some vinyl work. And, it didn’t turn out that well. This is why I ended up with Kandor’s cardstock technique for other more precise pieces. So, maybe I’ll try again this year, but, with some direct drawing.
Printable shrink plastic experiments
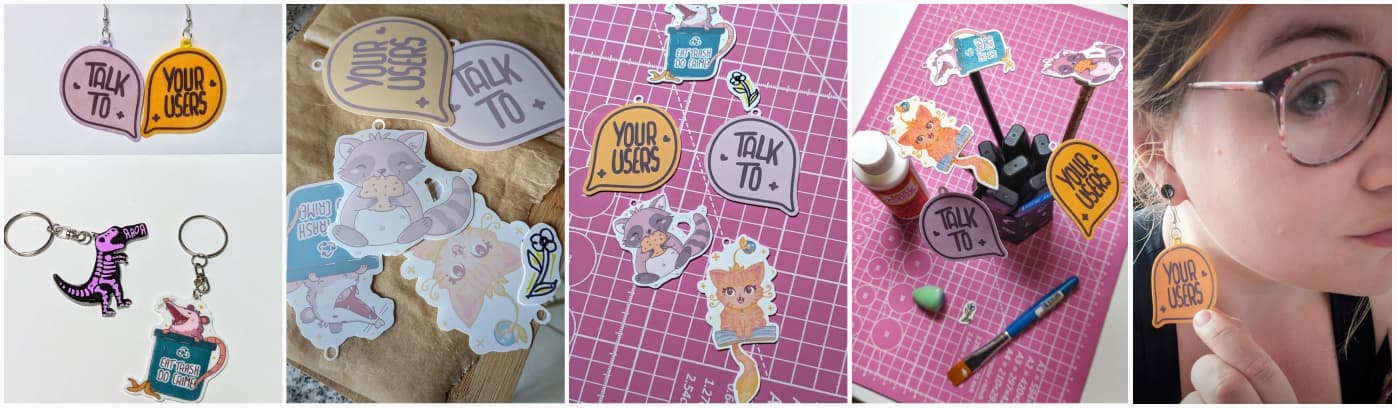
I discovered there’s some printable shrink plastic. It’s a little bit thinner than the other one and you don’t get the glossy shine by default. But, I still decided to give it another try. Which means: I bought a heat gun. Seeing it shrink under the heat is the fun and satisfying part of the process. Check the shrinking video of a couple of pieces on my Instagram. To print and get a nice color, you need to make it lighter and desaturate, since it gets darker when you shrink it. I turned them into pins and keychains and some very cool “Talk to your Users” UX statement earrings. But, this type or shrink plastic has the same issues as the other one: it skews in a certain direction. And there’s really nothing you can do about it. You can try to predict how it will skew, because usually it skews in one direction the paper. But, that’s about it.
Stamps
Last thing I tried this year was stamps. I got a blockface kit for my birthday, so I played around with some ink. I also got some foam and tried to cut some stamps in it. It’s not perfect, but, it’s quite fun. I might explore this more next year.
And, it’s a wrap
Gosh, that was long. I think it took me 6 hours to write this, collect all the pictures and the links. It’s been a long fun year on the craft side. I hope 2024 can be the same.
So far, I want to explore a couple of things this year
- More hot foiling, I really love what you can do with the quill
- New stickers: I have a list of things I want to draw and turn into stickers
- I also got some reflective heat transfer vinyl. I didn’t get to use it. I have a project to customise a bag, and maybe some clothes for more security on my bike during the night
- I hope, paint that horrible pink wall into something else, haha.
Disclaimer: some of you asked for reference for paper and material on different social media, so, this article contains some amazon affiliate links.