
Create better conference slides and presentations
Do you want to start a journey in public speaking, but are no designers ? You’re in the right place! Today, I am showing you the ropes and basics to help you craft slides that look professional. Slides that will help catch the audience’s attention, while still keeping them focused on your talk. No magic; mostly planing, typography, content layout, images, audio, video and content tips. And a few extra tips on rhythm, notes, technical checks, rehearsals. You know, all those small details to make sure you are and feel prepared. As bonus, I bundled this all quick checklist to help you not forget anything. So here we go, let’s start your slides journey together 🙂
This article is a transcript of the tips I gave for Women Talk Design’s next cohort of “Present yourself with confidence” workshops that starts soon. And this year, I am one of their guest speaker.
Inspiration, Planing, Preparation & Rehearsal
The first tip I can give you about slides, is actually to not start with the slides, but with a plan and a structure.
Start with understanding what type of “conference style” you want to go with. Take a look at other talks and slides for inspiration : technical ones, inspirational ones (like keynotes), case studies, etc. What style do you enjoy? What would YOU be comfortable with?
Some people have 125 slides for a 45min talk and go super fast from slide to slide. Some people have 25 slides for 45 minutes and talk a lot on each slide. I’m usually a 90slides for 45min kind of gurl. Up to you to see what you are more comfortable with. It comes with practise and might change over time.
Have a plan
** Xayha and Rakan’s voices “We have a plan? We always have a plan” **
I always start with a plan, not the slides. I like to write my talk like articles, it helps with storytelling. Some people write a plan with a few bullet points. Some people use mind mapping tools. Whatever works for you.
For anything topic and plan related, I recommend you read Lara Hogan’s excellent “Demystifying public speaking” book. I prepare my plan in Gdocs, with a LOT of bullet points and titles. But, again, that’s me. Whatever tool helps YOU organise your structure. Then, I don’t want to invest too much time in the slide design until I have the structure and timing right.
If this is a “non remote talk” (yes, remote is the new normal haha), I also plan for “OMG I can’t share the computer’s audio and there’s no internet connection in the room” worse case scenarios. Because this might happen. Can you still give your talk from a PDF version of those slides? If you planned a live demo, record it in advance. Just in case. And have the recording as a backup in case wifi is dead. Be prepared for a “lower” version of those slides and talk if necessary.
Rehearse the structure with “skeleton slides”.
So I start with basic slide structure (titles + text), kind of like a skeleton of future slides.. I rehearse them once or twice to get the timing, storytelling and content right. Then I do the design (this way I avoid designing slides I won’t use).
I also sometimes rehearse that basic structure in front of an external observer to get feedback about the rhythm, the flow. If also helps me see if the order of the slides make sense. I don’t need super detailed designed slides for this, it’s about structure.
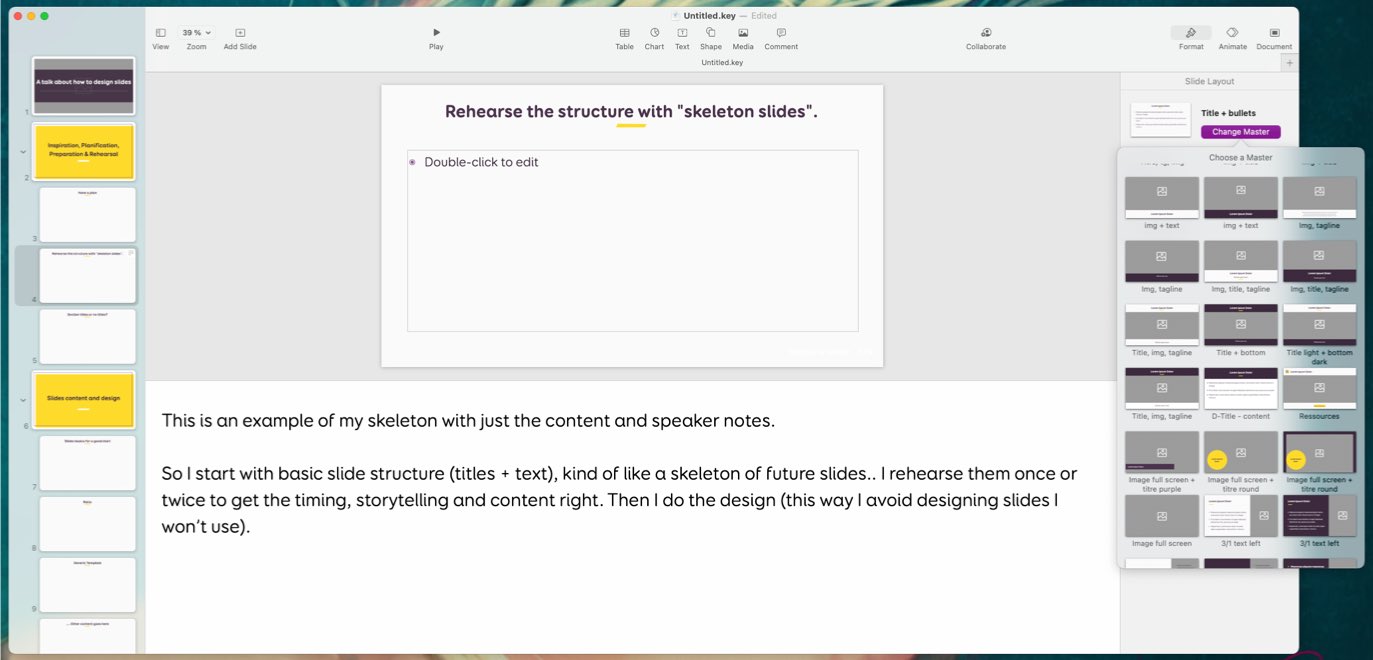
This is what my skeleton usually looks like: the main titles, the slides with mostly just some text and some notes
Once I have the slides finished, I still rehearse a lot. Usually, if it’s the first time I give a talk, I am up to 4 or 5 rehearsal sessions. This is important for me to get the timing right. I know that I’m stressed out and tend to speak faster, but still. You don’t want to be the speaker who messed up the whole organization because your 20 min talk took 35 min (I saw that happen). I have friends who can finish their slides 1h before the talk and pull it of. Goof for them. BUT, if this is your first talk, don’t do that. It will be even more stressful for you. Be prepared 🙂
Section titles or no titles?
Having clear sections with titles work well for technical talks and talks where each part digs into a specific topic. Titles also help transition from one idea to the other and let you have a small “breathing” (even water) break. If you have titles, having a summary of what you’ll talk about at the beginning can help the audience project into the talk. Some other talks are following more of a storytelling inspirational path. For those, it might be strange to have titles in the middle of the story. But, it could still work.
Slides Content and Design
A quick note: those are generic advice for people who give their first talk, want to improve their presentation and slide skills and might not be designers. I speak and talk in English and French, so those advice is for LtR (Left to Right) languages. You could reverse the tips for RtL (Right to Left). I honestly have no idea if this would apply for TtB (Top to Bottom) languages (like Chinese).
Here comes my main advice: your conference slides are a visual support to help the audience follow what you are saying. It is NOT here replace you. You want them to listen to you, not read your slides. So, all the tips here will try to focus on that idea. Non visual distraction.
Which means that those tips apply mostly to conference slides. Workshop and teaching slides are a little bit different. Because they are also used as support students and workshop attendees refer back to. So, if you are teaching classes or presenting a workshop, your slides might contain more content that what I advice here.
Slides basics for a good start
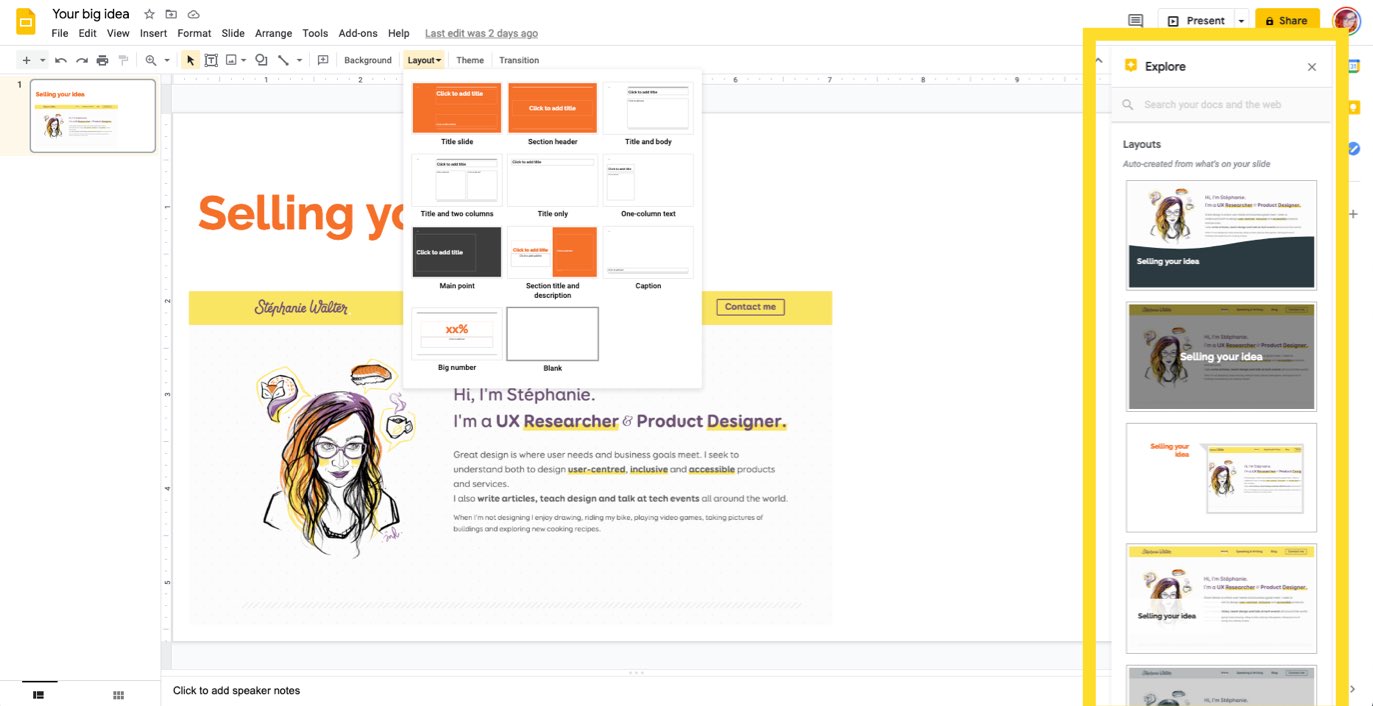
Gslide Explore layout offers multiple layouts for an image and text combination
Let’s cover a few basics first:
- Slides ratio: 16:9 works on most projectors those days and is ideal for online presentation. 4:3 is still an option since most projectors can switch between one or the other. I prefer 16:9 because it gives more space for nice visuals.
- You can always ask the organizer about the format of the projector if they know it.
- There’s NO SHAME in using a generic theme when you start. Most themes come with a lot of options and layout.
- Use a consistent theme : colors, consistent font-size, etc. The best way to achieve this is to use slide templates/ master. If you don’t use a generic template, you can start from scratch. Most tools have blank starter themes. Or modify an existing theme to adapt to your colors / fonts.
- GSlides even has some machine learning suggestions to try to find the best layout based on your content.
- Avoid too many ideas on one slide. If you have a lot of ideas and content, it’s better to split “one idea by slide” so the audience can follow.
Choosing your color scheme wisely
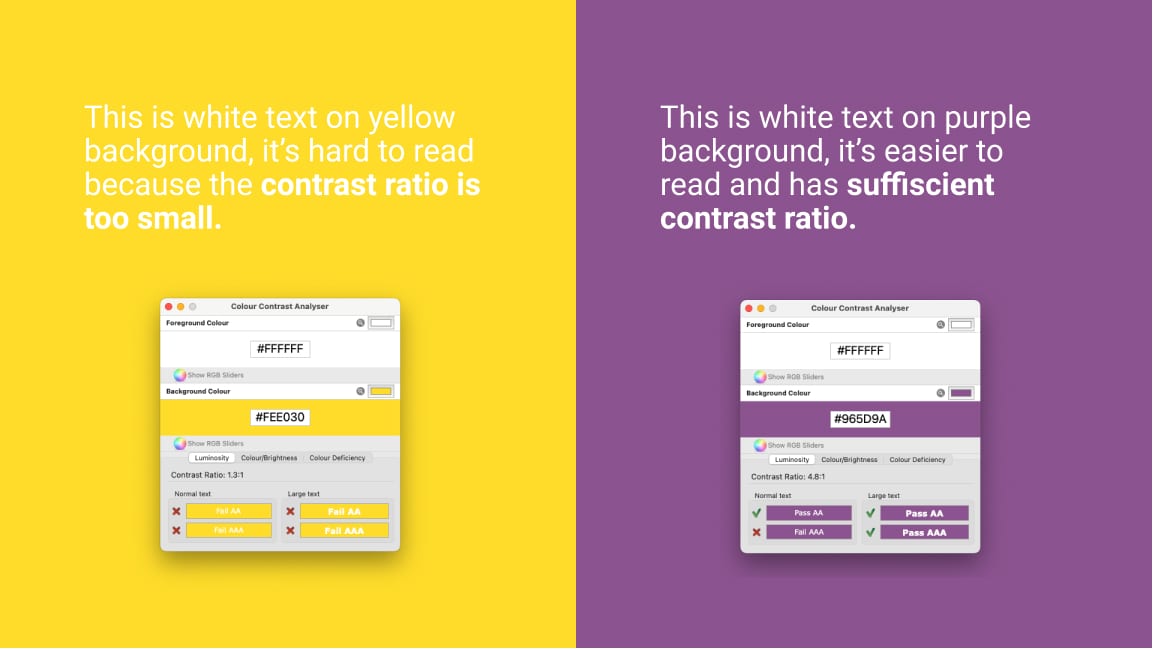
When it comes to colors, be careful with text/background contrast and follow main accessibility guidelines. Especially if the slides might be displayed on old projectors. I am not going to detail how to pick colors here, I wrote about it in “Tips to Create an Accessible and Contrasted Color Palette“. Also check “Color accessibility: tools and resources to help you design inclusive products” for more details and tools to help you. Also Geoffrey Crofte has an awesome article on “Pantone 2021: Working on an Accessible Color Palette“.
One question I have often is the “do you recommend light or dark theme”. It is an interesting debate. It depends.
- Dark themes work for dark rooms. If you know you will present in a theatre or cinema for example.
- If you are not a designer it can be hard to make some good readable dark mode slides that work nicely with pictures.
- Dark themes work nicely with code, and “non images just text” kind of slides.
- Some colors tend to “bleed” or “move” on a dark background. If you put some levels of blue on dark themes for example I will have a headache after 10 minutes in your talk. So, again, it might be complicated.
- So, if this is your first talk and you are not a designer, unless you found a template that works, stick to light themes.
- If you go for a dark theme, avoid pure white text on pure black color. The contrast might be too high for some people (like me, yes there’s such things as too high contrast).
- Also if you are doing more of a workshop, some people like to print the slides to have a physical handout. In that case, dark mode is going to cost a LOT of ink.
Fonts and typography
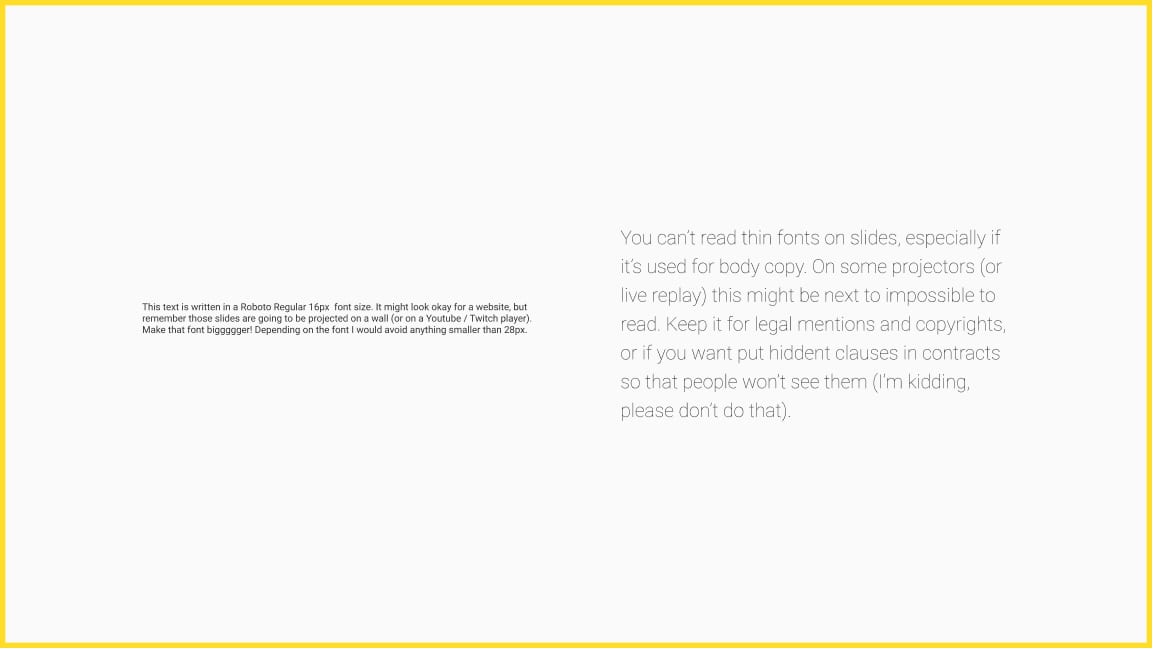
Size: remember that people might look at those slides from super far away. Get a big nice font-size for titles (something around 34 – 50px). And then a font big enough for body text (I would advise you to avoid going under 28px). And avoid those thin fonts. Avoid scripts for body copy and anything fancy and hard to read.
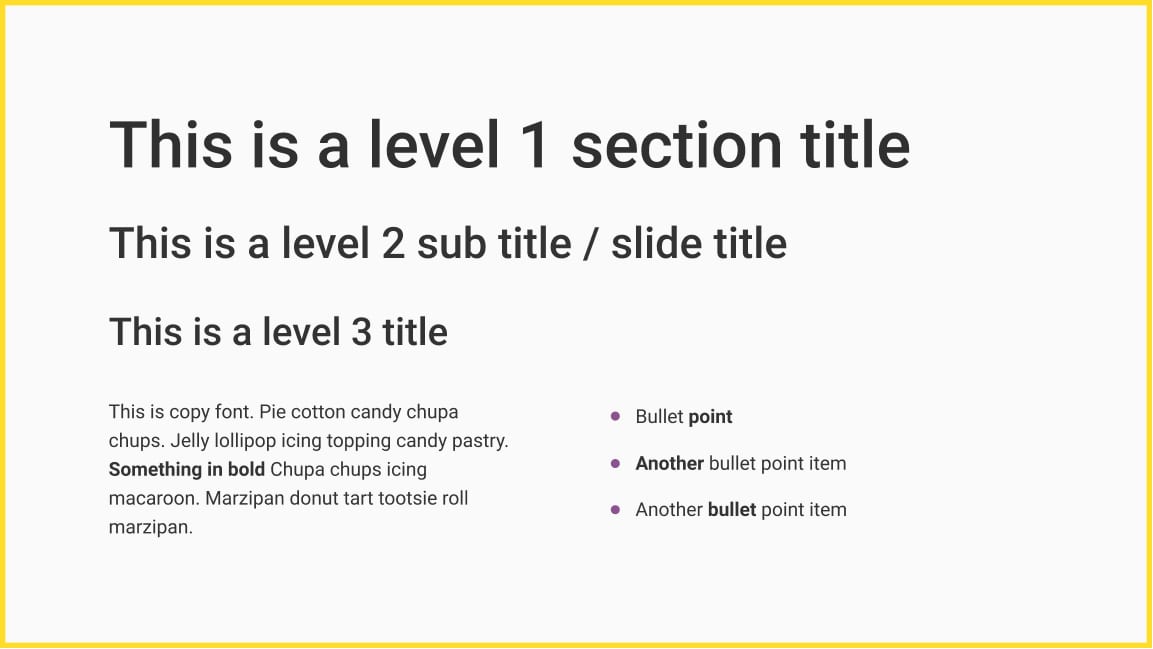
Font hierarchy and ratio: usually you need a font-size for some “big section titles”, then a “header in the slides” size and some body and bullet font-size. You can use mathematique ratio to create balance here (or tools like https://type-scale.com/). But again, most templates usually are well built, so use the template font hierarchy
Also, you want to keep consistency. Try to use the same font-size for “big slides titles”, “header title on a slide” and “body copy” all the way through your presentation. Again, designers who master font and visual hierarchy will play with this rule. But if you are a beginner with no design background, stick to the rules ^^
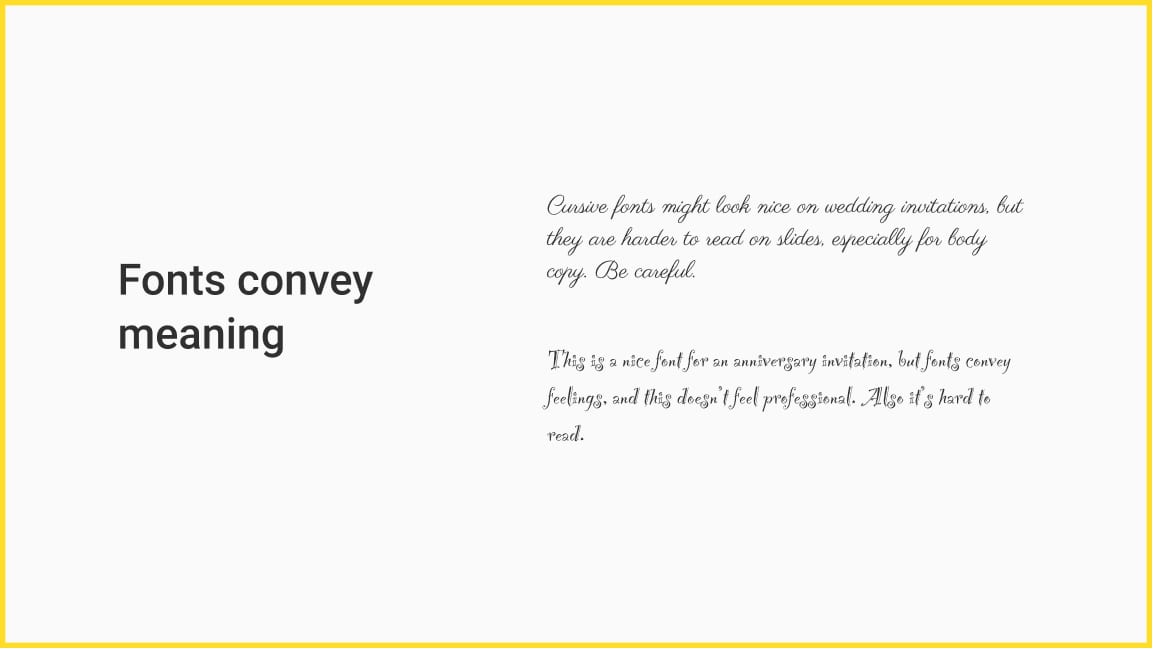
Now, here are a 2 tips on font choice and pairing: fonts convey meaning. Be careful with those (a cursive is nice for weddings, but hard to read on slides for example). When in double, stick to the basics, even if they look boring. Same for font pairing: if you are not a designer, stick to one font and multiple weight. Or use one of those tools:
- Some examples of good Google Font pairings
- A curated list of (google fonts) pairings that work well together
- Another curated list of nice pairings
- Okay, one last list of fonts that work well together
- Font pairing generated with deep learning
- Font Combination by Bold
Last but not least: don’t use vertical writing (again, this applies to LtR languages). And yes, I know some templates offer the option. But it’s annoying for the audience to have to turn their head to read something.
Caps and alignments
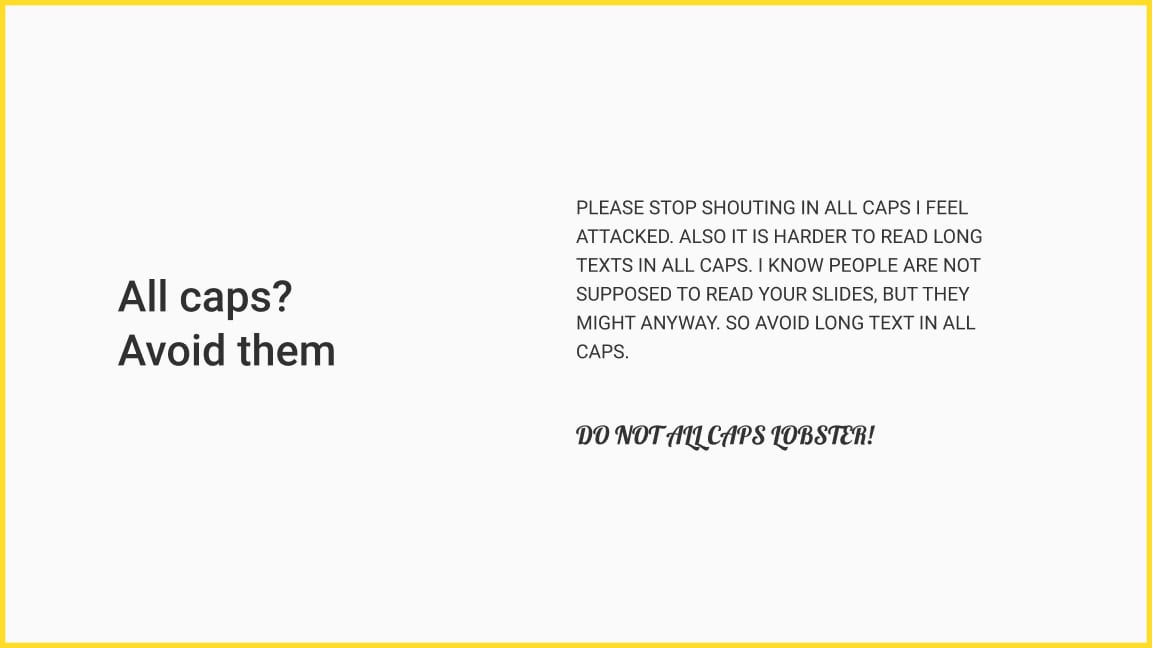
Avoid all caps on super long titles / text. It is harder to read for some people. But you could use caps it to emphasize some words.
You can use bold to emphasize some important elements. Remember that if everything is bold, nothing is emphasized anymore. So, use this carefully.
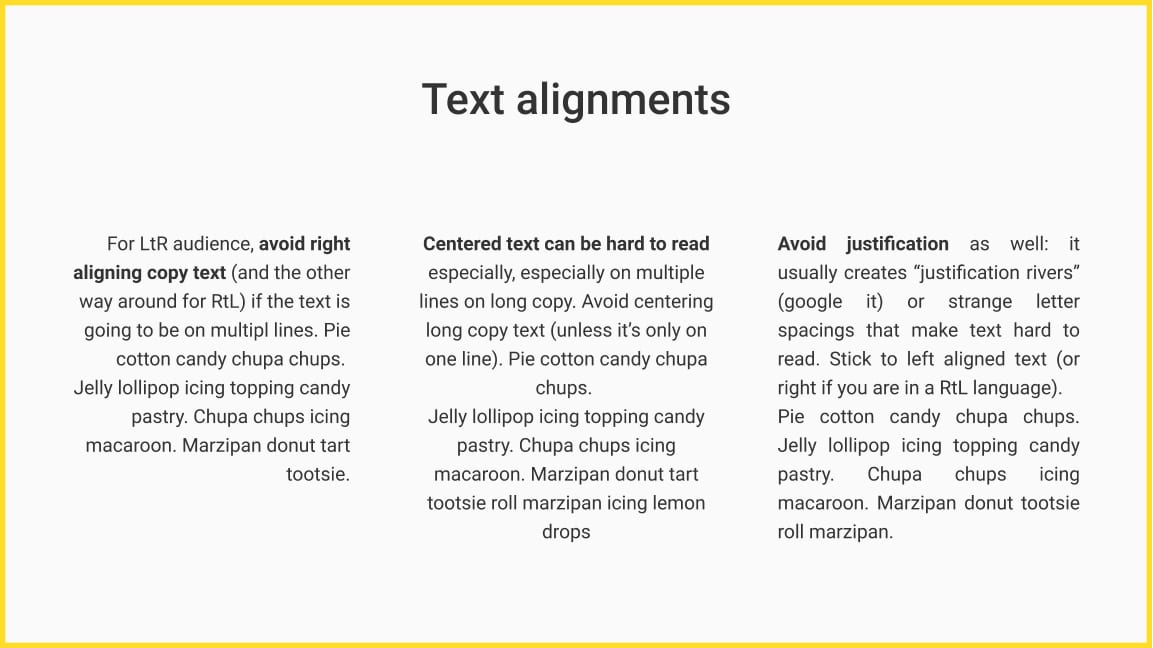
For the alignment:
- For LtR audience, avoid right aligning copy text. And the other way around for RtL. This is not true for graphs thought you might need to right align legends.
- Also centered text is hard to read. So keep centered text for titles, avoid on body copy, avoid at all costs on bullet points!
- Same for justification: it usually creates “justification rivers” that make it hard to read. Stick to left aligned text (or right if you are in a RtL language).
Structure your content with bullet point lists
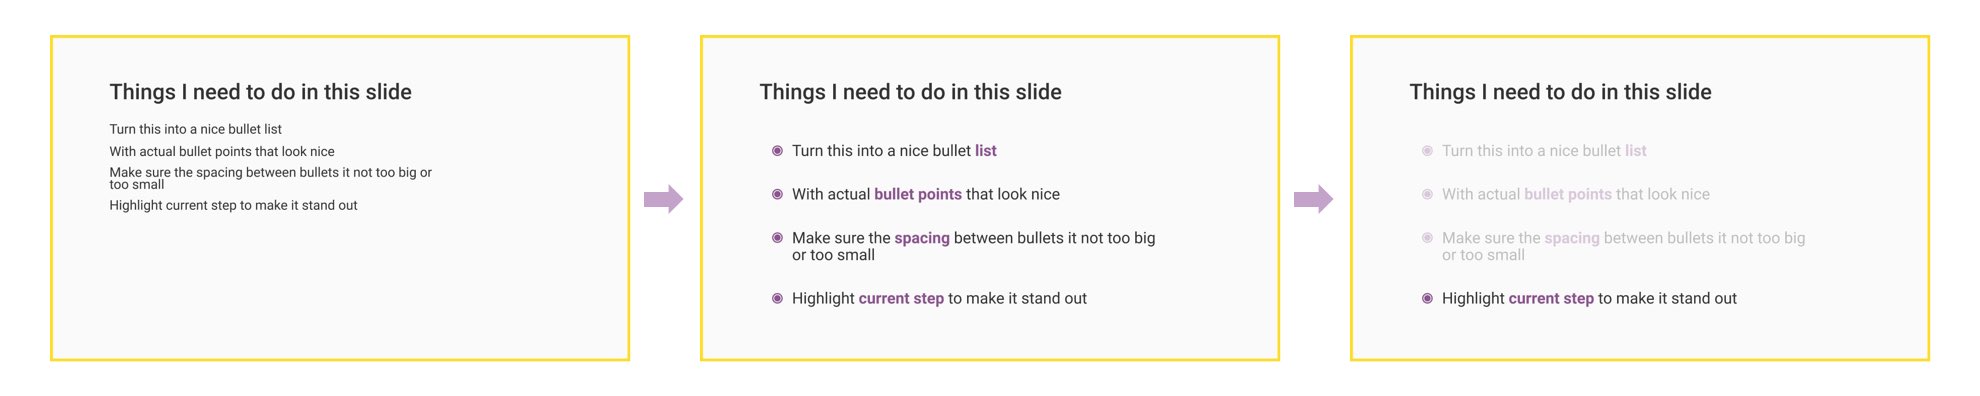
Bullet point lists is a good way to structure some heavy content. Here are a few tips:
- Use a bullet list, but not too many bullets.
- I mentioned before you want to have one idea by slide. You could have multiple ideas with bullet points but… They need to be all related to the same topic. And after 4/5 bullets it’s hard to follow.
- Try to keep each bullet content short. Unless it’s teaching slides that you will give to students after. But for conference talk slides, again, you don’t want people to read it.
- So, put the main idea in the bullet in a few words, then develop it in your speech.
- Tools like keynote let you play the bullets one by one. It’s a nice trick to help people focus on the current bullet.
- Another trick is to gray out any bullets that are not the current topic
Structure your content with layout and composition
The human eye loves structures. And things that are aligned. Slides should also follow basic “aligning design elements” rules:
- Use guides to make sure everything is aligned properly.
- Sometimes the guides are hidden, you usually find those options under “view” of the main tools/
- Also use the alignment tools in your presentation software to align content with each other. They usually “appear” when you select multiple elements. They are under things called “align” or “arrange” It’s amazing how just a few alignment can change some slides.
- Same tips for distribution. Use the horizontal / vertical distribution options when you have multiple elements and want them to be equally spaces.
- Don’t put important information in the edges in case it might get cropped. Or you might have your webcam on top of it with certain tools (Skype I hate you).
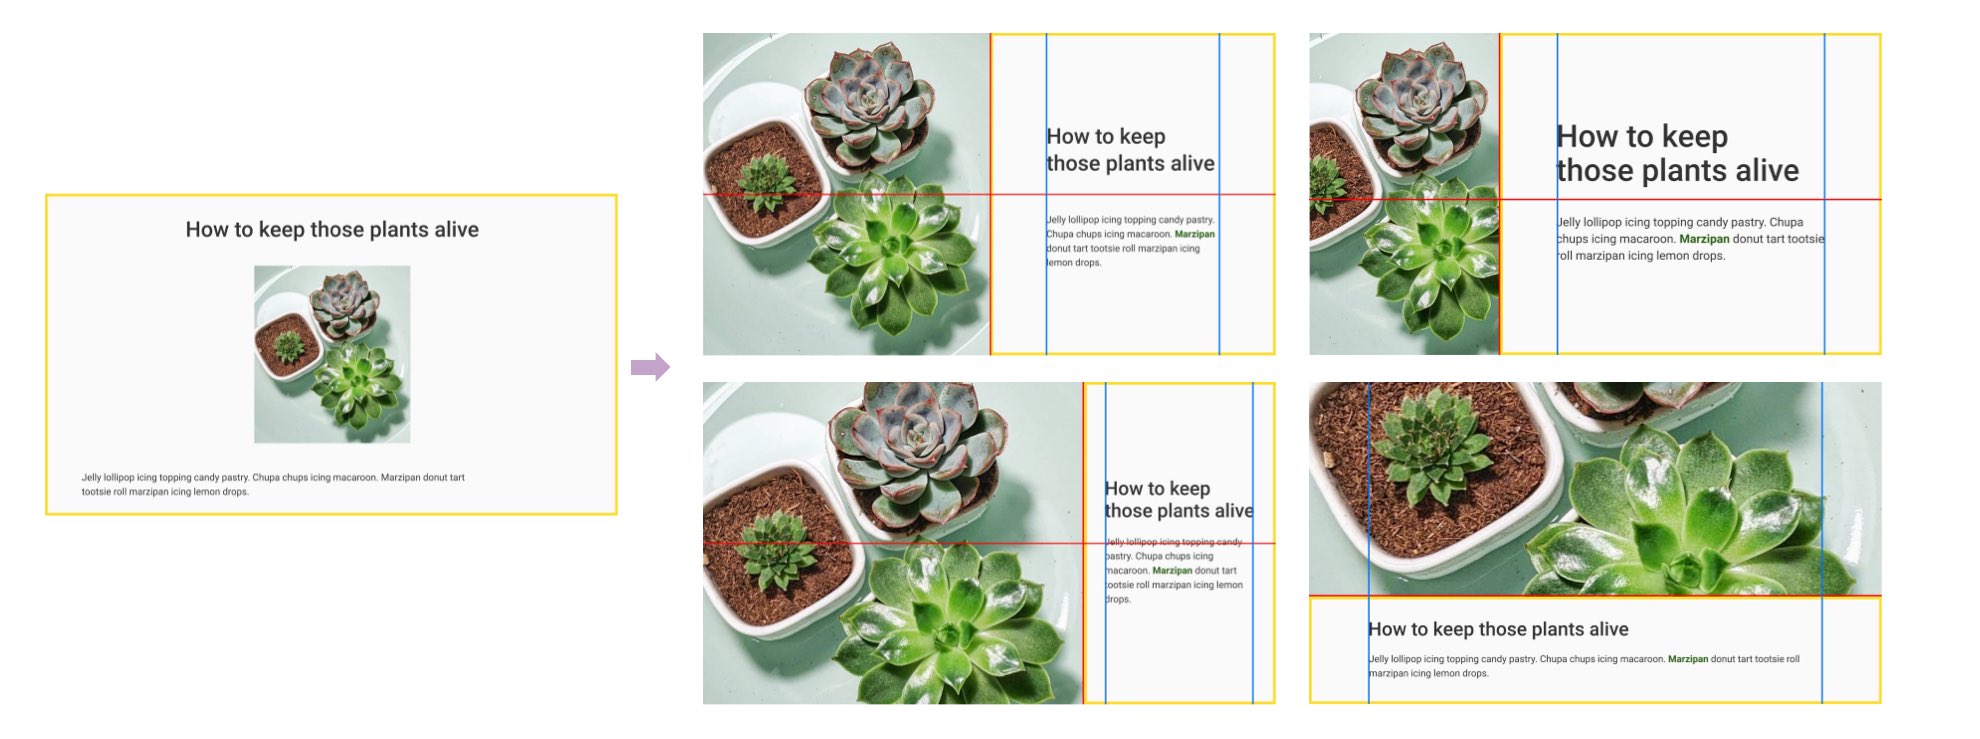
You should also follow some rules of composition to make your slides more balanced when you have multiple elements (like text + image)
- Vertical splits work well: content left + image right or the other way around.
- You could also use math ratio: 1/3 – 2/3 . Explore different options depending on your content density and image sizes.
- Top / bottom composition might work in some cases. But it depends on the image.
Here are some visual examples of different compositions using the same image and text. It depends what you want to put more emphasis on. Note the blue and red lines: those are my guides/rules.
Using images in slides
How to chose the right images for your slides is out of the scope of this article. But most tips I give in “How to make your blog images stand out & reflect your identity” also apply to slides. So be sure to check it out.
Now, let’s talk about how to use those images and what you need to be careful about:
- Keep the ratio of images when scaling. ALWAYS. This is the number one deadly sin of images in slides. Horrible stretched images make me want to cry. And make YOU look unprofessional and amateurish.
- If you have a portrait image, it is easier to use a left / right composition (see tips above). You don’t think you need to center everything 🙂
- Be careful about how the image is cropped, what the focus of the image is. For example: avoid chopping someone’s head of with your image cropping
- If you scale up images, make sure they are not pixelated (especially for high def projectors).
- On that note SVGs are awesome for images that scale without pixelation (but Keynote doesn’t like them).
- Accessibility: if you have images that bring information like graphs, tell the audience what’s on the image. Some people might be blind, some people might listen to your talk in audio only. You could put the description in the notes to help you remember to describe it (this doesn’t apply if you have decorative images that are here to fill the space and make the slides look nice).
- Looping gifs might look fun, but they are quite annoying if they stay on screen for a long time.
- Also, anything moving is distracting to our reptilian brain and draws attention. So, be careful with looping videos, gif or animations (more on that in the video section).
- Diversity is important. Try to avoid having only images of white men in your presentations. Especially for a quite diverse audience. Same for different body types, different disabilities, etc. The best talks have inclusive images.
- Also, if you quote people, it would be nice to not only quote the same white men everyone is quoting #stevejobs
- Drawing illustrations for your slides is an awesome idea if you draw, but, this takes a LOT of time. You are warned. (still I love the illustration slides style).
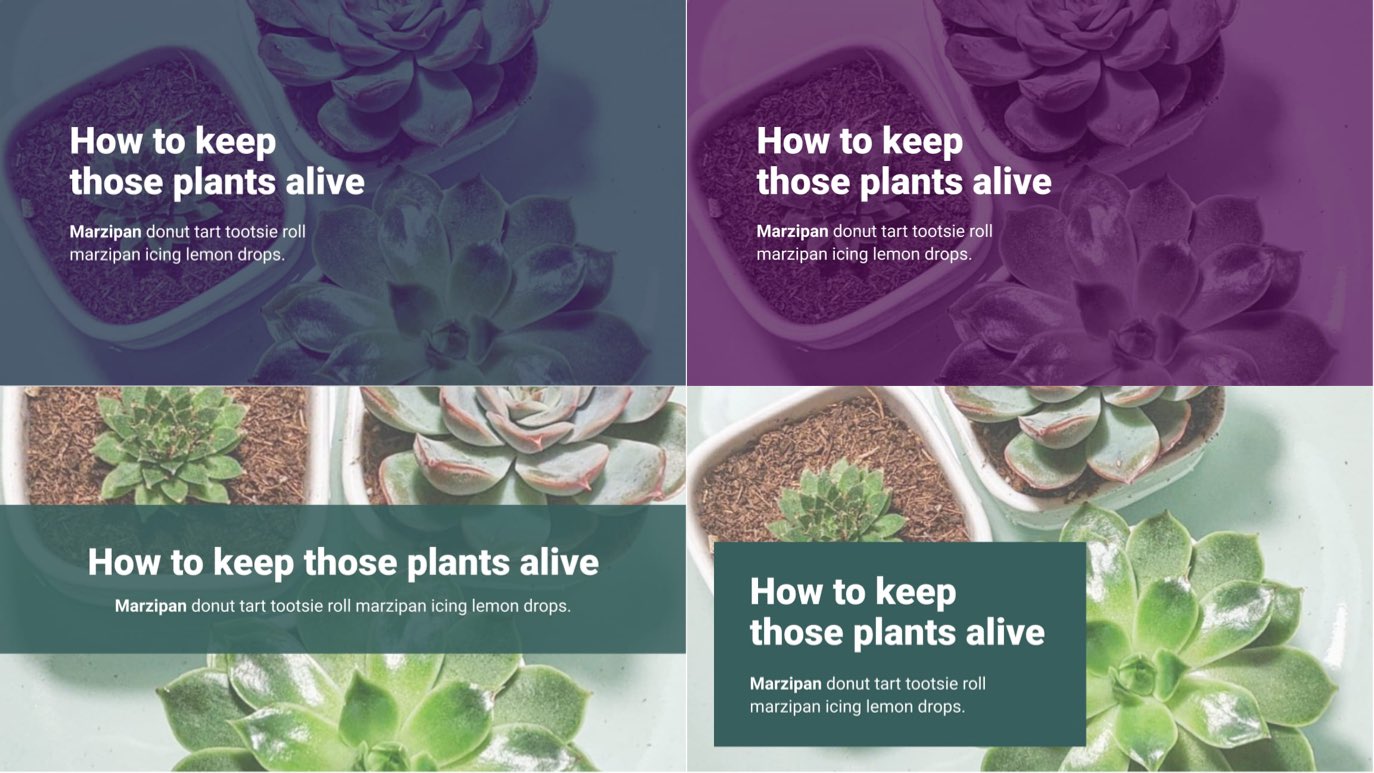
You can also have fun with full screen images. But then how do you deal with the text? Here’s a few ideas:
- If you use background images and text on top of those, again, be careful with contrast and accessibility. You can have a dark (or dark colored) overlay on top of them to enhance contrast
- Instead of having a whole overlay, you can have a background only on your text (like put the text in a box).
- That background can be a rectangle like the example below. But you could have fun with shapes. I use a lot of text on full yellow circules in my talks. Just be careful because text might be more complex to read if it follows a complex shape
Graphs and chart
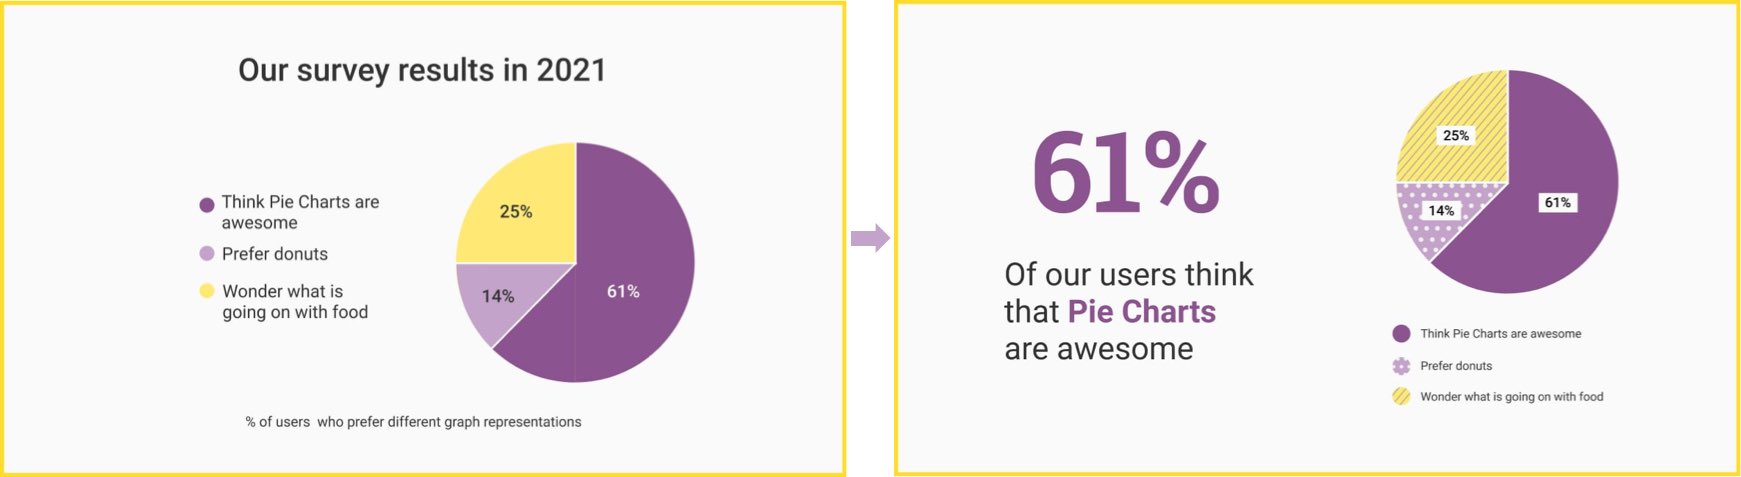
I’m not a big fan of graphs and charts because they bring a lot of cognitive load to the audience. And again, you want people to listen to you. Not to try to understand the graph on the slides. So, here are a few tips:
- It’s hard to keep the audience engaged with complex graphs. Extract the main idea, one number and don’t show graphs at all.
- If you really need a graph, try to make it simple. Avoid gradients and visual noise. Remove unnecessary information. Keep in mind that it’s supposed to be a visual help for your talk, not the other way around.
- Also if you use graph, be careful about accessibility: don’t use color as the way to convey information.
Last but not least, it’s not always easy to find the “right” visual representation for the data. Should you go with a pie chart? An histogram? Here are a few resources to help:
- From Data to Viz
- Data Visualization – How to Pick the Right Chart Type?
- An intro to designing accessible data visualizations
- How to pick more beautiful colors for your data visualizations
Multimedia content (videos, audio, animations)
This is a personal preference, but I am not a big fan of animations and things moving around. Prezi’s zoom in/out makes me nauseous, literally. They are distracting at best. So, I tend to avoid eye candy animations between slides. Or to stick to smooth fadein/out.
It’s even worse if you present remotely. There’s a chance that people will not even see your animation anyway if there’s a latency with your bandwidth. Or frame drops.
As I explain in my talk “Enhancing User Experience with CSS Animations“, animations are a good candidate for storytelling. They can help explain complex concepts, like graphs or flows. So, I would use animations in those cases: when moving things around on the screen helps people understand the concept.
When it comes to audio and videos with sound, here are a few tips:
- If you have sound, test audio before the talk. Make sure it’s not too loud for the audience.
- If you are presenting remotely, it’s a whole other mess. By default, most video conference tools only route the audio of your microphone. Some tools like zoom have a checkbox that lets you also share the audio of your computer. But most tools don’t. If you have audio in your slides and want to play it remotely, depending on the tool, you need to reroute the audio of your computer to the microphone. You need some virtual cable software to do so. I use loopback for that on mac.
- Based on your bandwidth, your videos might be super poor quality, or have some frames that drop. Be prepared to describe what’s happening on the video if you are speaking remotely.
- Usually webcams use a lot of bandwidth. If you want to keep the quality of the audio and your screen sharing, it’s sad, but sometimes it’s better to turn off your webcam.
Most presentation tools now also let you embed videos. A short video can be a nice way to help get your message accross to your audience. It’s also a life saver for demos. I’ve seen so many demos backfire, that now, I don’t do them live anymore, I pre-record them instead and play the video during the talk. It takes a little bit of time to record, prepare and cut, but there’s plenty of tools online, like FlexClip, that can help you with that. Also, if you have some sound in your video, don’t forget to have some caption so that the audience can follow. It will also save you in case the sound doesn’t work.
Announce triggering content
Some multimedia content might be triggered for different reasons. I usually try to announce when some content might be triggering at the beginning of the talk, and then, just before the triggering slide comes. For example: I have a talk on UX design where I use a campaign for safety vests where the person is drowning. This is a horrible (yet effective) image, and drowning might trigger some people. So I announce this at the beginning of the talk, and just before I play that video.
This is also true for animations. I have a whole talk on CSS animations and I know some of those might trigger motion sickness so I announce them before playing them, and only play them once.
It’s also true for sound. I once almost left a conference room because the speaker was playing samples of ASMR and the audio was so loud and it created some cognitive overload for me. I covered my ears, the friend next to me left. Announce that kind of audio content before.
Giving the Talk: rhythm, speaker notes, pausing, breathing and drinking water
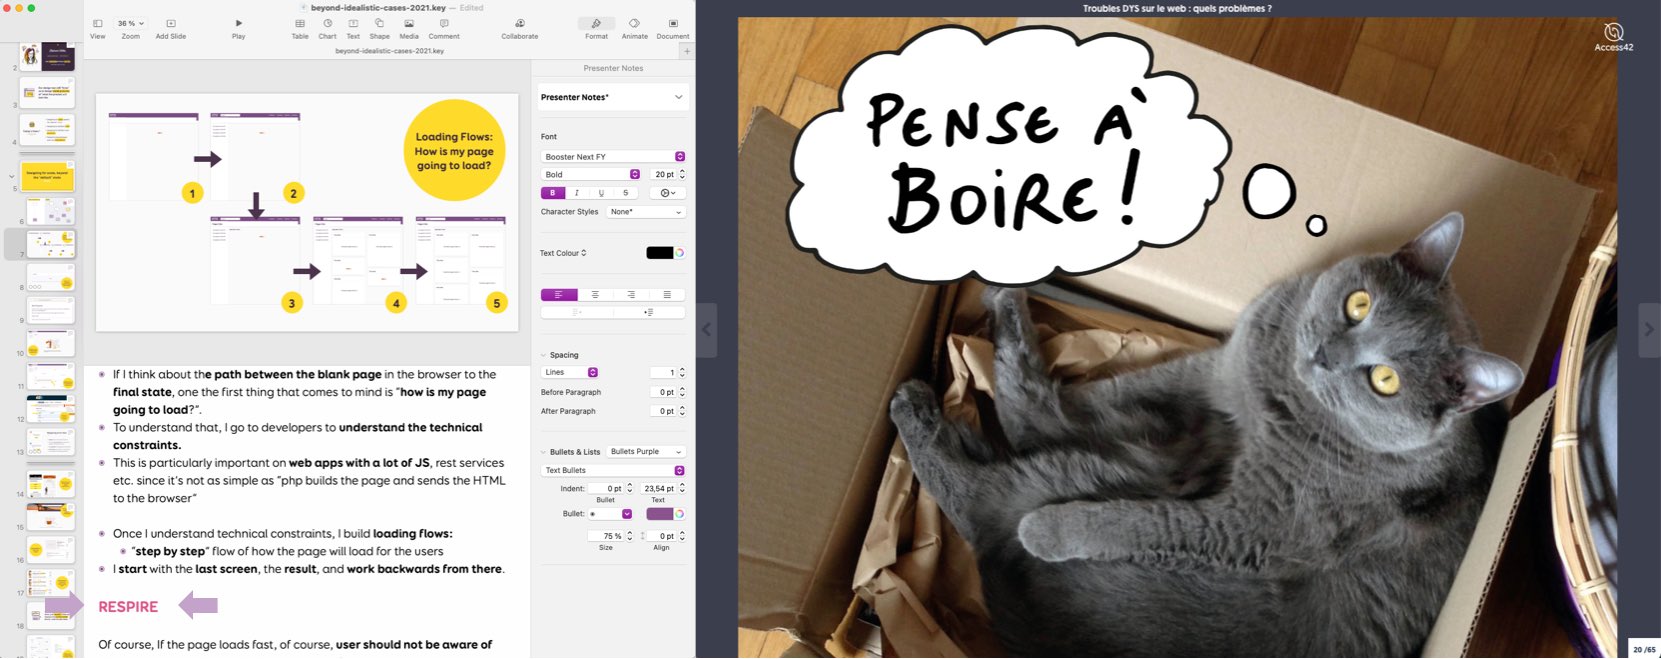
My notes on the right with the “breath” written (in French) and Marie’s “don’t forget to drink” slide
Okay, we tackled the part of the slides people can see. I got a few more tips for the part people don’t see.
- I put a lot of notes in the slides, even full sentences. This helps me because English is not my native language.
- Stress can make you forget what you wanted to say. I don’t want to read those notes (but you can totally read them if this is your style), but I want to have them around if I am lost. It’s one of those “I am prepared I won’t panic” things.
- Those notes have words in bold. This way, even if I do not read them, my eye still has words to focus on if I need them.
- Notes also help me with timing. I found out that if I don’t have notes or script, I tend to talk way much more on specific slides. It’s usually okay in a meetup when you are the only speaker. But, if you are talking at a conference and you have a specific amount of time, going off topic means you have to go quicker through some other slides later.
- I write “BREATH” or “RESPIRE” in purple on my notes. It’s strange, but it helps. I know speakers who have a “breath post it” on the screen. It’s just one of those reminders.
- Talking will dry your mouth and it’s actually a big brain activity, your brain needs water. Have a few slides where you know you can drink some water. It can be a title slide. Or you could have a cute slide with your pet on it, that works too. My friend Marie Guillaumet does that and the audience loves it. Here’s her cute cat.
Technical check and room setting
You have nice slides, you are prepared. You rehearsed. Everything is fine. There’s still a few extra things you can check and do to make sure everything runs smoothly for your talk.
- If you can visit and take a look at the room you will be presenting into (or ask pictures) to adapt, it’s nice. It also helps me be less nervous.
- Be careful about stage and room layout. I presented in a flat room where all the participants were on the same level, super low screen. It meant that any text at the bottom of the slides would not be seen by some people. It’s okay if I read that text, but still it might be frustrating for the audience.
- Check the air, is it cold on stage? Warn ? This way you can dress to be at ease.
- Try to know where the notes will be displayed. Do you need to be close to your computer? Are there some small screens at the bottom of the stage? Are your notes big enough?
- If you speak remotely: ask to see the template. I have seen conferences that cover part of the left of the slides with a speaker webcam. They should not, but you never know. Try to see the remote setting and plan accordingly.
- Some conferences have live captions (online and in person). Those captions take space on the screen. So maybe your slides will be smaller than expected because of the caption. Again, ask.
- Ask for a technical check before. Check audio, check the wifi if you need it, check the slides format. If you have videos, check if they are smooth (especially if it’s a remote online conference).
- If it’s a remote conference, ask to use the tool before to test how it works. Try to know how it will work. Do you have to share your screen and unmute yourself at a specific time or does a technical person do it for you? I once spoke at a conference in Russia and the tool was in Russian. I was glad that we did some technical checks so that I knew where to press to share my screen and webcam.
Most conferences are used to all of that. So they will usually come to you for technical checks and all. But, you can never be too prepared.
A few other final tips
This was a looong list of tips. So, just a few last things before you go
- Enjoy yourself. The audience is rooting FOR you. They are usually just a bunch of nice people eager to learn and listen to you.
- The audience doesn’t see your notes, your plan. If you miss something, they might not even notice 😉
- If it’s possible (and it doesn’t pose any issues with NDAs and such), giving access to the slides to the audience before or during the talk can be useful.
- If there’s someone who will introduce you, you could drop the “me presenting myself” slide. This is good advice if you are on a tight schedule and need to remove slides haha, like me.
And if you present online and remotely:
- Check with the organizers if you will take the questions during the talk or after. Some speakers are comfortable chatting with the chat audience while going through the slides. While some other speakers don’t like their flow to be broken and prefer the questions at the end. Both are okay, know what makes YOU comfortable and communicate with the organizers.
- For remote conferences, what’s important is your voice and slides. I think it’s okay to switch off the camera if this causes bandwidth issues. You want to keep the audio and screen sharing quality as high as possible.
- Live caption: Powerpoint has some built in live captioning tools. It’s not perfect but it’s a start to try to make your content more accessible if the conference doesn’t provide any (I wish Keynote had that). For me it’s okay in English. French is a mess though.
Checklist
We all love a good checklist. Well, at least I do. So, to help you not forget any of those tips, I prepared a small checklist in PDF that you can download a go trough when you’ll design your first slides.
Download the Slides Checklist in .PDF
Resources and more tips from other people
And here comes the usual list of other tips you could check on that topic:
- My friend Morgane Peng wrote a nice article to help you start with public speaking. Also thank you Morgane for the proof reading of this article ^^
- Again, check Lara Hogan’s book
- Accessible Speaking Best Practices